인프라 준비
- Ubuntu 20.04 깡통 Ec2 생성
- 기본 프로그램 설치하기
- Ec2 Type: >= t3.xlarge , c5.xlarge
- Security 그룹 생성
- AWX-SG
- 80 port
- Target Group 생성 + Ec2 추가
- AWX-TG-80
- NLB 생성 + Target Group 추가
- AWX-NLB
- Route53 도메인 생성 + NLB 연결
필수 컴포넌트 설치
1. ubuntu 업데이트
sudo apt update && sudo apt -y upgrade2. k3s kubernetes 설치
curl -sfL https://get.k3s.io | sh -
sudo systemctl status k3s
서버 재시작 후 재실행
sudo chmod 644 /etc/rancher/k3s/k3s.yaml

3. Deploy AWX Operator on Kubernetes
3.1 git 설치
sudo apt update
sudo apt install git build-essential
3.2 Clone operator deployment code
git clone https://github.com/ansible/awx-operator.git
3.3 Create namespace where operator will be deployed : awx
export NAMESPACE=awx
kubectl create ns ${NAMESPACE}
3.4 Set current context to value set in NAMESPACE variable
kubectl config set-context --current --namespace=$NAMESPACE3.5 awx-operator directory로 이동
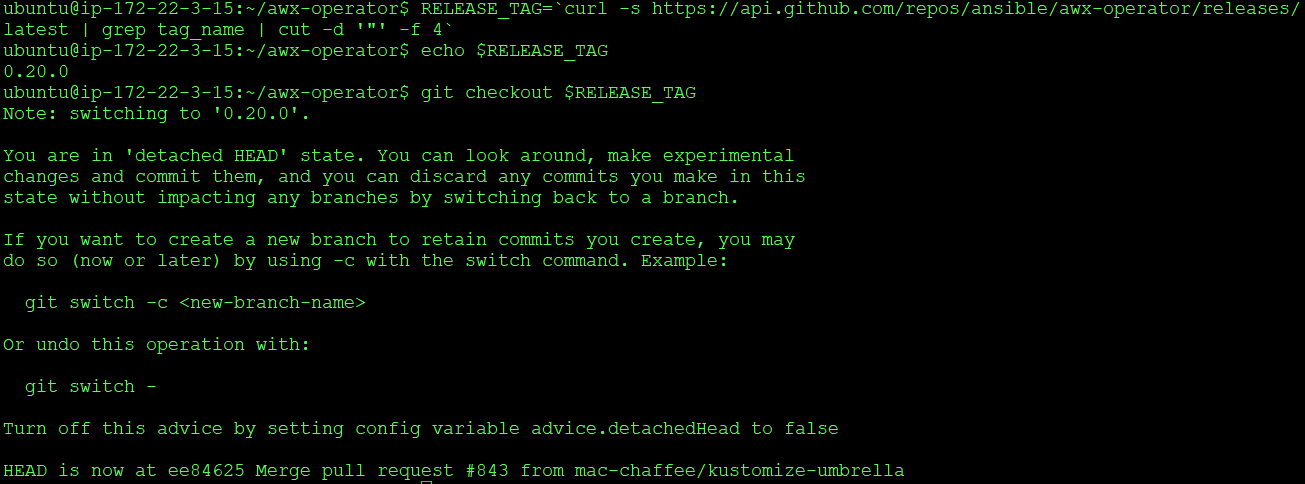
cd awx-operator3.6 AWX Operator 릴리스의 최신 버전을 RELEASE_TAG 변수로 저장한 다음 git을 사용하여 branch 에 checkout합니다
sudo apt install curl jq
RELEASE_TAG=`curl -s https://api.github.com/repos/ansible/awx-operator/releases/latest | grep tag_name | cut -d '"' -f 4`
echo $RELEASE_TAG
git checkout $RELEASE_TAG
3.7 AWX Operator를 클러스터에 배포
export NAMESPACE=awx
make deploy
kubectl get pods
4. Operator를 사용하여 Ubuntu 20.04에 Ansible AWX 설치
4.1 PVC 생성
cat <<EOF | kubectl create -f -
apiVersion: v1
kind: PersistentVolumeClaim
metadata:
  name: static-data-pvc
  namespace: awx
spec:
  accessModes:
    - ReadWriteOnce
  storageClassName: local-path
  resources:
    requests:
      storage: 5Gi
EOF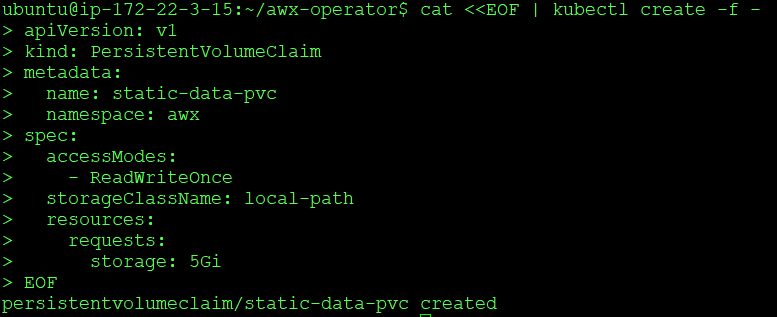

4.2 AWX deployment file 생성
vi awx-deploy.yml

---
apiVersion: awx.ansible.com/v1beta1
kind: AWX
metadata:
  name: awx
spec:
  service_type: nodeport
  projects_persistence: true
  projects_storage_access_mode: ReadWriteOnce
  web_extra_volume_mounts: |
    - name: static-data
      mountPath: /var/lib/projects
  extra_volumes: |
    - name: static-data
      persistentVolumeClaim:
        claimName: static-data-pvc
deploy 적용
$ kubectl apply -f awx-deploy.yml


operator pod 로그에서 설치 프로세스를 추적할 수 있다.
kubectl logs -f deployments/awx-operator-controller-manager -c awx-manager
Data Persistence
kubectl get pvc
sudo ls /var/lib/rancher/k3s/storage/
Checking AWX Container’s logs
 kubectl -n awx  logs deploy/awx
 error: a container name must be specified for pod awx-75698588d6-r7bxl, choose one of: [redis awx-web awx-task awx-ee]

kubectl -n awx  logs deploy/awx -c redis
kubectl -n awx  logs deploy/awx -c awx-web
kubectl -n awx  logs deploy/awx -c awx-task
kubectl -n awx  logs deploy/awx -c awx-ee
AWX Container에 접근하기
kubectl exec -it deploy/awx  -c  awx-task -- /bin/bash
kubectl exec -it deploy/awx  -c  awx-web -- /bin/bash
kubectl exec -it deploy/awx  -c  awx-ee -- /bin/bash
kubectl exec -it deploy/awx  -c  redis -- /bin/bash
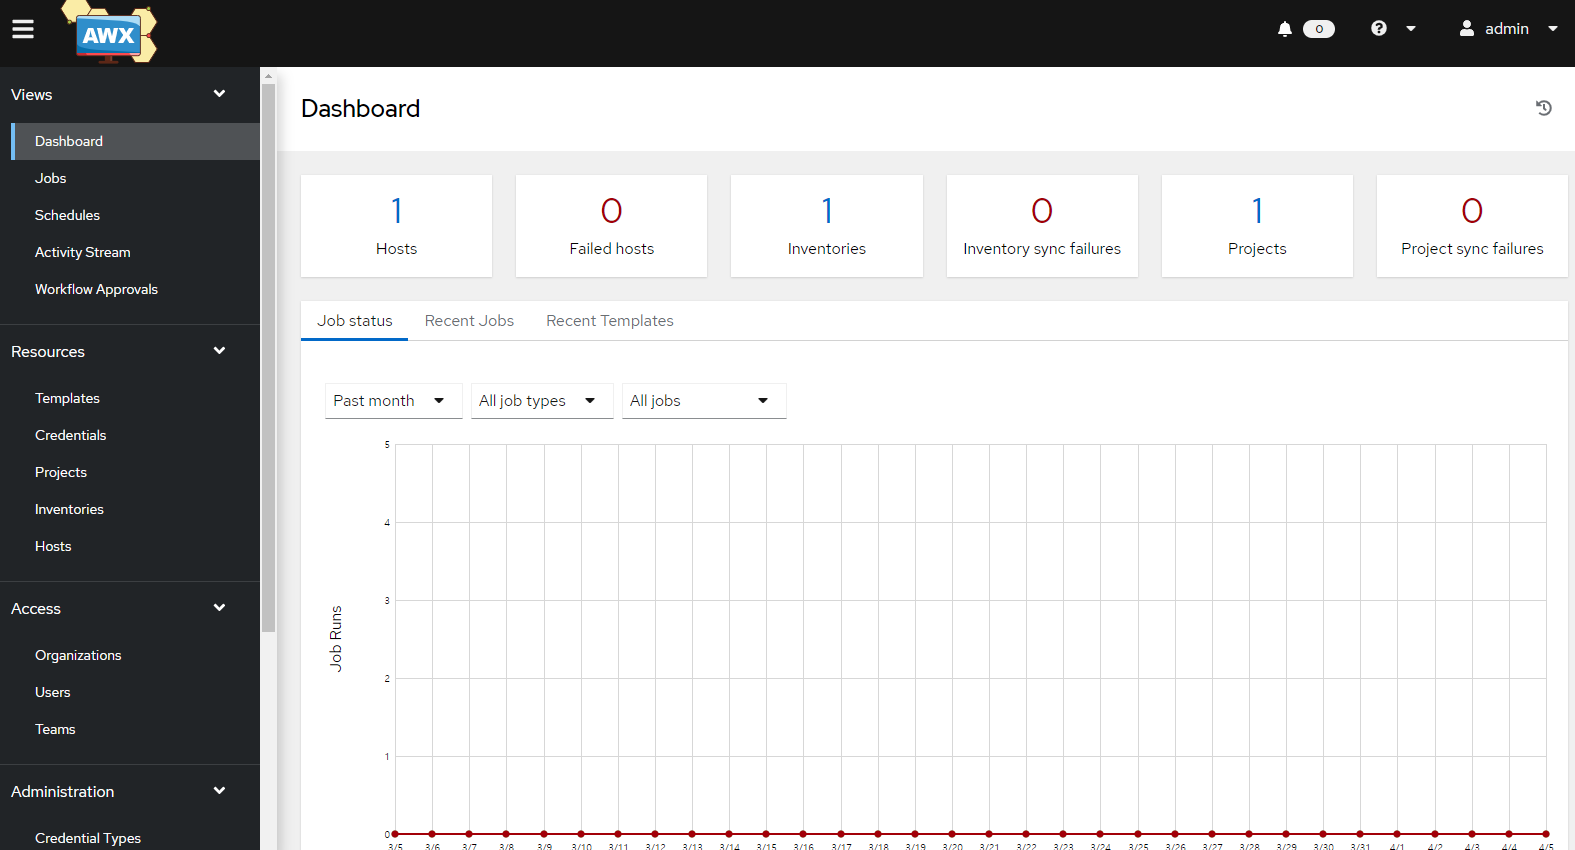
5. Ansible AWX Dashboard 접속
사용 가능한 모든 서비스를 나열하고 awx-service Nodeport를 확인
kubectl get svc -l "app.kubernetes.io/managed-by=awx-operator"

NAME           TYPE        CLUSTER-IP     EXTERNAL-IP   PORT(S)        AGE
awx-postgres   ClusterIP   None           <none>        5432/TCP       59m
awx-service    NodePort    10.43.70.229   <none>        80:30080/TCP   58m
Login Username: admin
password:
kubectl get secret awx-admin-password -o jsonpath="{.data.password}" | base64 --decode

# or

kubectl get secret awx-admin-password -o go-template='{{range $k,$v := .data}}{{printf "%s: " $k}}{{if not $v}}{{$v}}{{else}}{{$v | base64decode}}{{end}}{{"\n"}}{{end}}'
Kubernetes 노드 리소스를 검토하여 AWX를 실행하기에 충분한지 확인합니다.
kubectl top nodes --use-protocol-buffers
반응형
'Ansible' 카테고리의 다른 글
| AWX 기본 구조 (0) | 2023.06.29 |
|---|---|
| 프로비저닝 자동화와 Ansible AWX (0) | 2023.06.29 |
| Dynamic Inventory (0) | 2023.06.29 |
| Ansible Vault (0) | 2023.06.29 |
| Ansible SSH Keys to managed nodes (0) | 2023.06.28 |


